
House Take 3

Starting out—photo by William E. Evans, ©2012
Just getting the permit had been a practice in persistence. The building permit, site permit, RPA (resource protection area) variance, VDOT permit—wait, we need a permit from VDOT? Oh, just a $10,000 road bond so we don’t damage their road; well that certainly makes—no sense—but the County wouldn’t release the building permit without it, so I hustled to the local VDOT office inconveniently located miles from the Herrity Building, so beloved by all in the construction industry where one hiked floor to floor and office by office, since the staff didn’t seem to talk to each other and couldn’t be bothered gophering the plans between them. It was all computerized, except it wasn’t; the paperless office hadn’t hit them yet.
In the first round of permits, Zoning said the existing carport didn’t comply because it wasn’t attached to the house—and it was several inches inside the front setback—despite it having been there for sixty odd years. And the bridge across the front lawn was verboten, until I explained it was to make the house ADA accessible.
The RPA folks then declared we needed to file a site plan—stamped by a civil engineer. Another $10 grand wasted. By their back of the envelope calcs, we exceeded the allowable disturbed area. My thought was I understood where the larger disturbance was, but said nothing. So the civil engineer basically redrafted the digital plans I furnished, put them on a new title sheet and we promised we’d plant close to a new yard to replace what wilderness the construction would disturb.
Why, you ask? Because the County’s RPA folks are concerned about protecting this privately owned waterway from being contaminated by runoff, conveniently overlooking what flows from upstream into the lake, road runoff, lawn fertilizers, poisons, and untold ‘white trash’ as the plastic bottles are referred to. And the occasional sewer line leaks brought to us by the sewer department. The regulations defy logic.
What the lake actually represents is the sole filtration system in the entire Holmes Run watershed—in little way due to the County.
And into the mix was the eager Architectural Review Committee for the Lake Barcroft Association, whose job it is to put one more obstacle in front of the project. We sat waiting for several months after obtaining the building permit, et al. for the “ARC” to sign off, during which we sat. And sat. Seems someone had complained that the addition was too close to the water. Offering to show the committee the zoning regs didn’t speed up the process.
We were heading into winter—the worst time for earthwork—and hadn’t yet broken ground.

Site in the early days—photo by William E. Evans, ©2012
Nothing Is Level; Some Things Are Plumb [1]
Got the call from Gabe just about the time they were beginning to frame the addition. “Did you know your house isn’t level?” “No.” “Well, it isn’t. It’s about an inch and half out of level where we’re to tie in, but that’s OK; we’ll fix it this afternoon.” Like he thoroughly enjoyed doing this kind of thing.
Which he did. Previously one Saturday, I watched him run a bob cat over the exterior deck of the house he was taking down across the cove, clearing the debris of the previous floor. Mind, a good part of the house had been built with no permit, and he was running a front-end loader across the floor like he wasn’t thirty feet in the air over a sixty degree slope ending in the water.
Gabe loves demo work. During our design, he had encouraged us to demo the three-story, two hearth-plus-gas-flue chimney to gain more interior space—which indeed it would. Though I suspect it was as much for the simple joy of tearing it out. However, I had and still have a special affection for the massive, white-painted beast. Instead of tearing it down, we added about six feet to its height so it would draw once the clerestory went up beside it.
D was upstairs in her attic office, when they began to jack up the second and attic floors. Accompanied by terrible grinding and snapping noises at the wood framing protested. Nail pops? We had whole wall pops.
[1] Old carpenter’s saying.
Existing house—photo by William E. Evans, ©2012
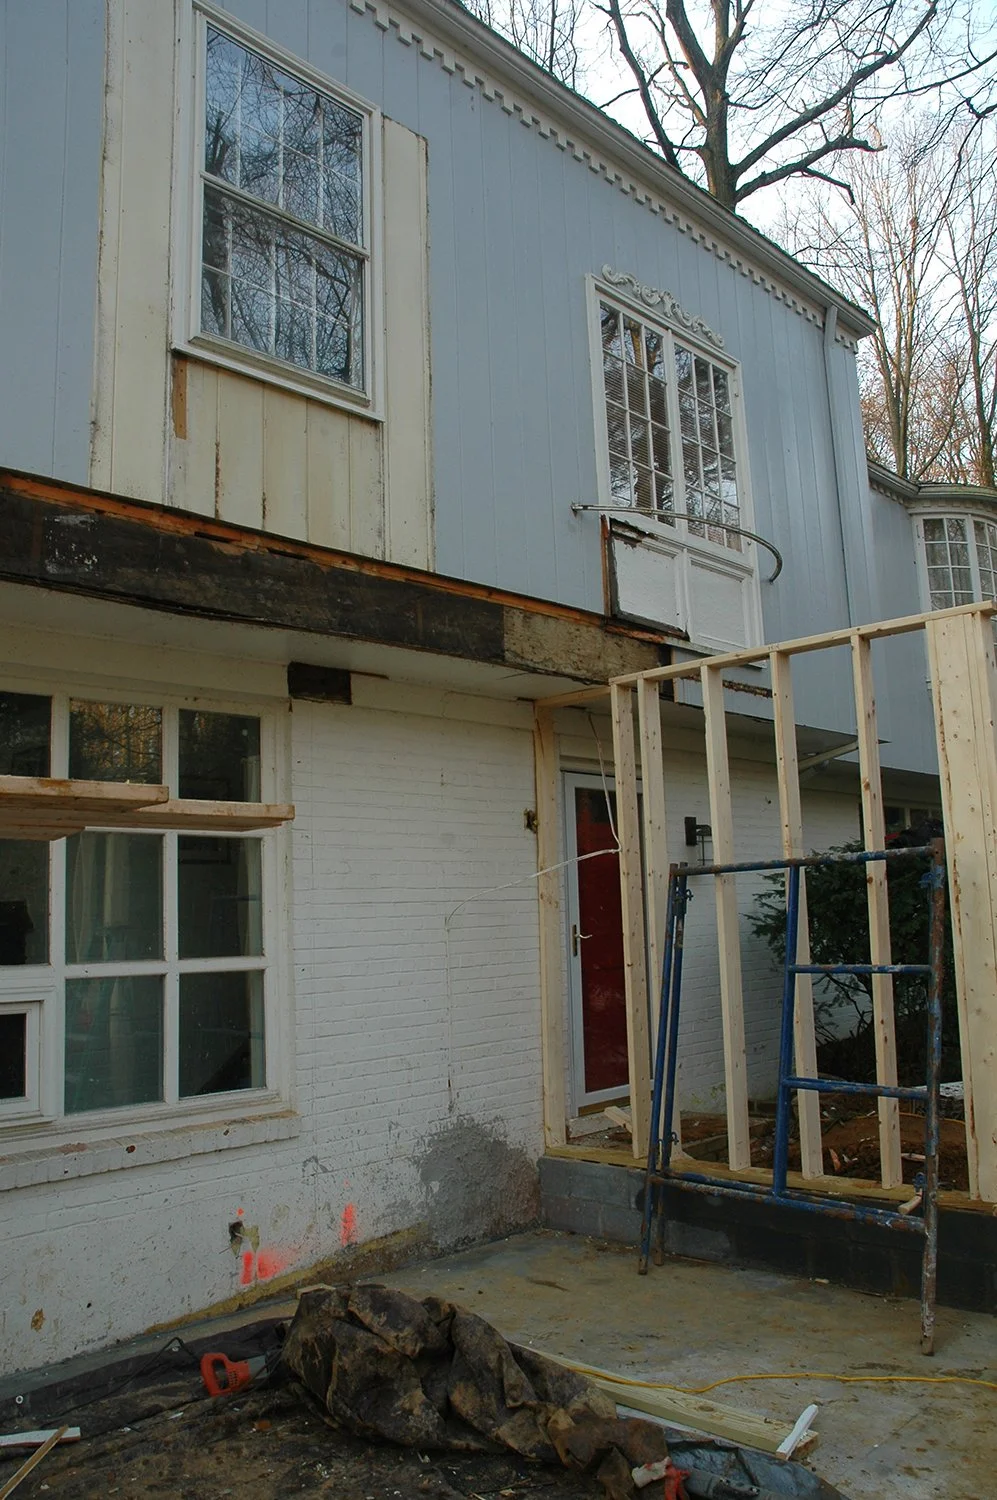
The second floor was cantilevered two feet beyond the ground floor masonry wall. The blackened, water-damaged edge beam made remedial work necessary. Photo was taken prior to the house jacking.

Existing house—photo by William E. Evans, ©2012
To the left, two of the four masonry shear walls loaded with rebar were going up.

Existing house—photo by William E. Evans, ©2012
The added 2x plate wedged above the window gives an idea of how much they jacked up the house.
“You think it’s easy?”
The existing cantilever was both a help and a hindrance. It helped dig for new footings without having to underpin the existing wall, but it also meant we’d be adding a load from the existing house onto the addition. The 5 x 24 glu-lam beam separating dining and living areas carries half the load of the existing attic floor, knee wall and roof above, in addition to half the load of the new addition. During design, when Randy Haist had told me the size of that monster, I gulped. When Gabe’s crew actually manhandled it into place, I gulped again.

Existing house corner being reinforced—photo by William E. Evans, ©2012
The dark, fat PSL (parallel strand lumber) beam is picking up the load from the second floor wall above. When the house was jacked up, the corner was no longer well tied to the existing masonry; the PSL beam tied the second floor frame to the addition. If it were to ever shift sideways, the addition would resist it.

Close-up of existing rear wall beam—photo by William E. Evans, ©2012
This is what an exterior deck framed directly into the house with no flashing will do to a beam over time. More remedial repair was necessary before the shallow five-foot addition could be framed here.
I had them insert a 3 x 12 glu-lam beam at the halfway span of the family room downstairs. The house had stood for sixty plus years, but every time D walked across the floor above, I could hear the china closet bounce with the floor. Plus the sight of the existing 3 x 12 floor joists spanning the length of the twenty-six foot room made me uncomfortable. Just another glu-lam that Gabe’s crew had to manhandle into position.

View from the future ground floor porch toward the lake—photo by William E. Evans, ©2012

View from the future 2nd floor toward the road—photo by William E. Evans, ©2012
We discovered where our sewer line ran—about an inch from the concrete bridge footing. They carefully hand dug beside it, poured the concrete footer, and moved on.

View from the future 2nd floor living room toward the lake—photo by William E. Evans, ©2012
Necessary as they were, the two masonry shear walls would cut down on the view from the addition.
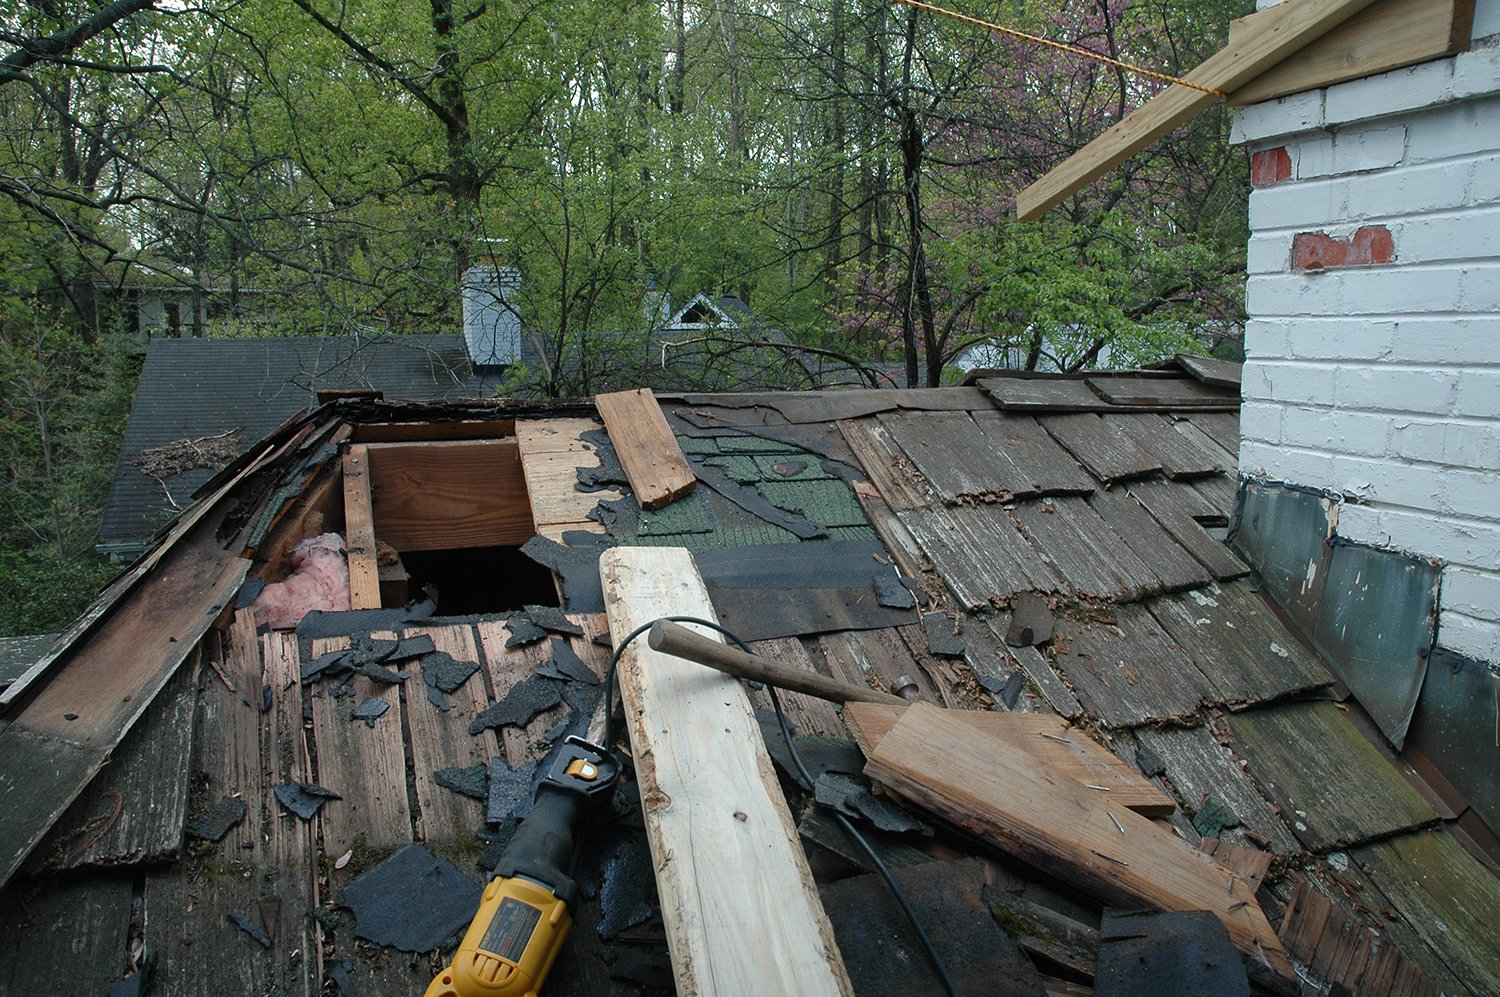
Existing hip roof being opened—photo by William E. Evans, ©2012
Whoever invented the reciprocating saw retired well, I’m guessing.
If you squint, you can see the greenish asphalt shingles with the rotting cedar shakes laid directly on top—which is wrong in so many ways.
Don’t let a contractor tell you it’s OK to put new roofing on top of old; it saves the boys time, but doubles the weight for no good reason. And cedar shakes need to be installed on furring strips so their undersides (which also get wet) can dry out. They need to breathe or they rot, added to which, if they rarely see the sun because the roof is too well shaded by the tree canopy, cedar shakes aren’t likely to make their full lifespan.
Shortly after this photo, the entire roof was replaced with 20-year asphalt shingles.

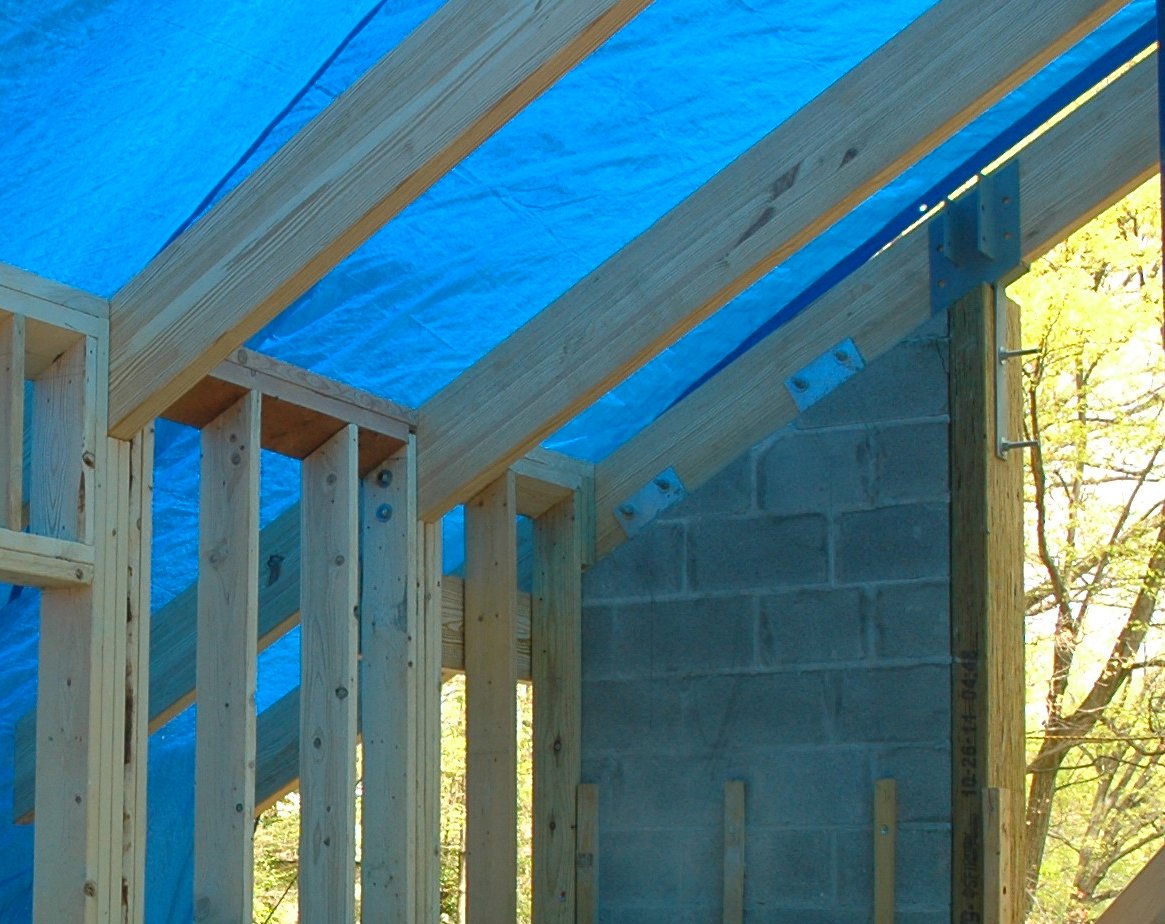
Top of the exterior loft framing—photo by William E. Evans, ©2012
Under the blue tarp, the work was proceeding in early spring. The crew worked from scaffolding; the loft floor—a tongue-and-groove structural wood deck—was yet to be installed. With the floor beams so widely spaced, plywood wouldn’t make the span.
Modern design means leaving the working parts exposed. And with few ways to disguise any mistakes, it takes a skilled framing crew. When the tall window wall arrived having been manufactured with the wrong slope not matching the roofline, Gabe had it replaced.
Closer view of the exterior loft framing—photo by William E. Evans, ©2012
View shows the last glu-lam rafter anchored to the masonry shear wall, and the next rafter thru-bolted to the 2 x 6 stud post. The loft’s lower windows were framed. The tongue-and-groove structural wood roof deck would go on shortly after.

View from loft down to 2nd floor extension—photo by William E. Evans, ©2012
The last of the four shear walls was going up at the far corner. Azaleas were blooming in April that year.
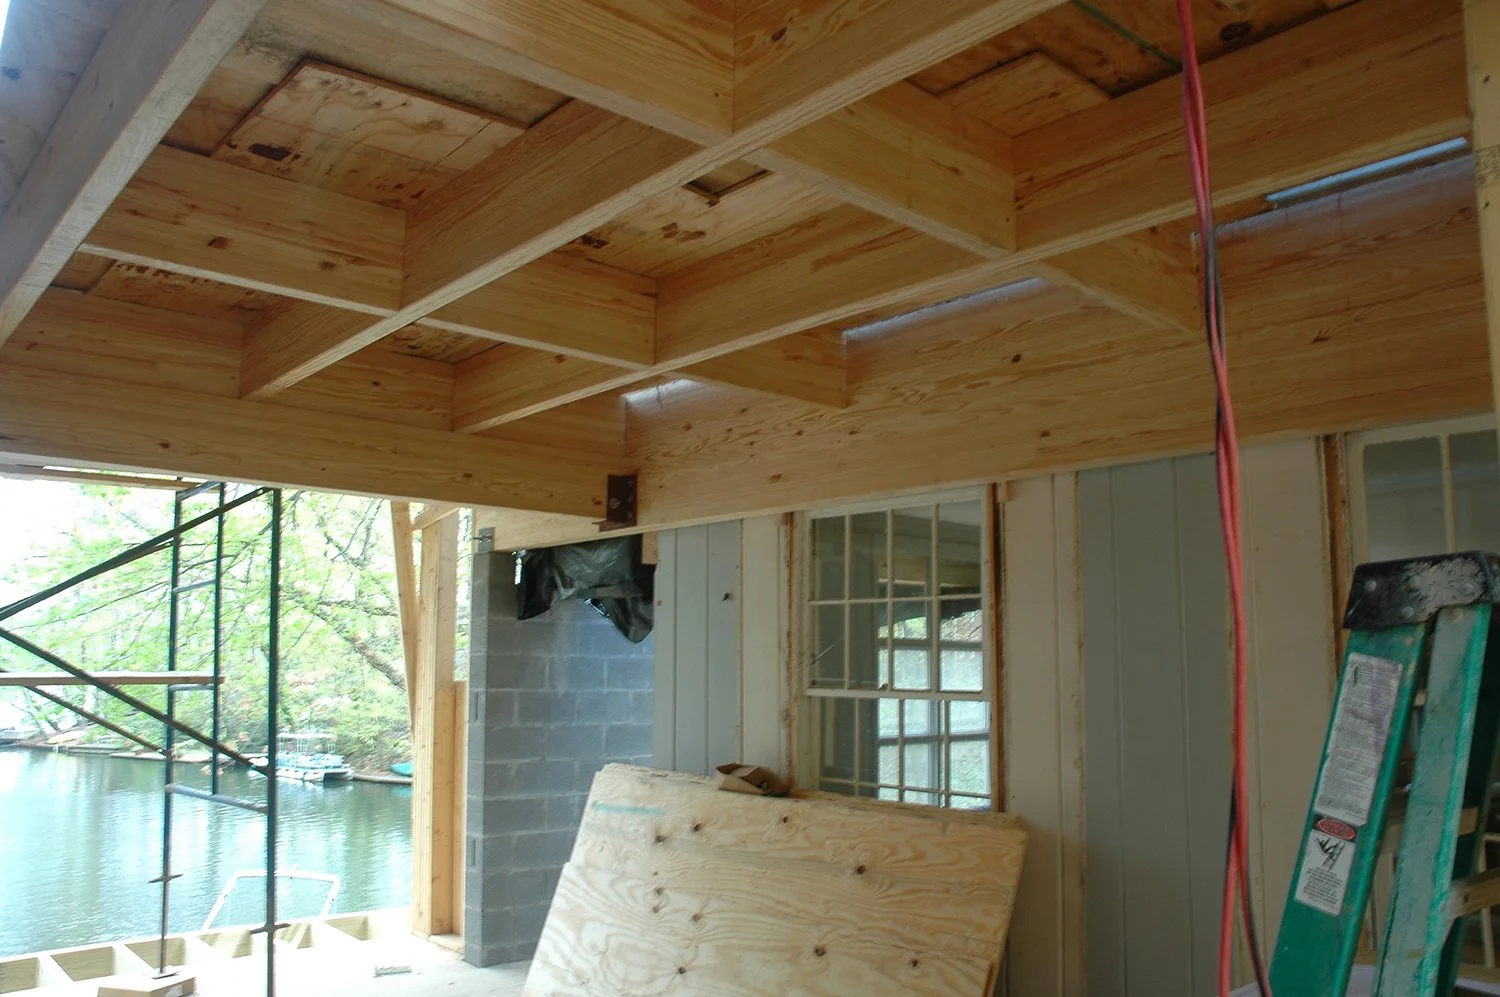
View of future living room—photo by William E. Evans, ©2012
The loft floor framing was installed. Overhead, the coffered beams and the 5 x 24 glu-lam were in place. The pre-existing exterior wall still remained; we were living the life just the other side.

View of addition exterior—photo by William E. Evans, ©2012
In this view, the bridge was already being used to bring in materials from the street. The loft’s floor beam was set behind the future window wall; I wanted the least amount of structure visible from the street, and the window wall was too tall to be self-supported so it would be carried on steel angles attached to the glu-lam beam on the interior. The little tricks you learn after so many years.
There it rose alongside the original house. Perhaps a bit too tall, but it had character, in spite of being set back so far from the road. Once the bridge was completed with railings, the composition would be complete.